
Introduction:
Floor scraping is an essential skill when it comes to renovating or remodeling spaces. Whether you’re removing old flooring, adhesive residues, or leveling surfaces, a floor scraper is your go-to tool. In this comprehensive guide, we’ll walk you through the steps of using a floor scraper effectively, ensuring a smooth and successful project.
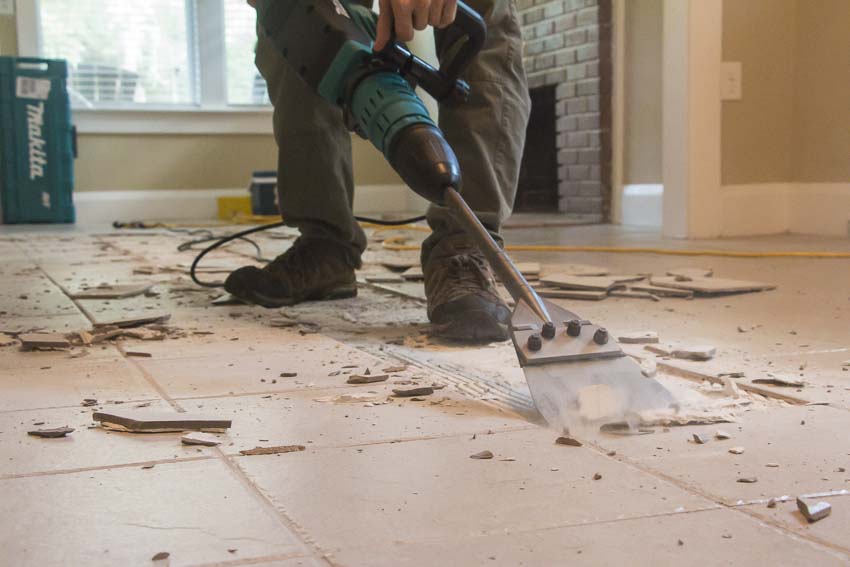
how to use a floor scraper effectively, position the tool at a slight angle to the floor, apply steady pressure, and either push or pull it along the surface, repeating the process until the desired area is free of debris or adhesive residues.
- Gather Your Tools: Before you begin, make sure you have all the necessary tools and safety equipment. You’ll need a quality floor scraper, safety gloves, safety glasses, knee pads, and a dust mask. Safety should always be a priority.
- Choose the Right Floor Scraper: Selecting the appropriate floor scraper is crucial for optimal results. There are various types of floor scrapers available, such as manual scrapers, hand scrapers, and power scrapers. The choice depends on the size of the project and the type of material you’re dealing with.
- Prepare the Work Area: Clear the space of any furniture or obstacles that might hinder your progress. Sweep or vacuum the floor to remove loose debris and dirt. This ensures a clean surface and prevents damage to the scraper blade.
- Inspect the Floor: Examine the floor to identify any imperfections, bumps, or irregularities. Knowing the condition of the surface helps you plan your approach and anticipate potential challenges.
- Wear Safety Gear: Put on your safety gloves, safety glasses, knee pads, and a dust mask. This protective gear is essential to shield you from potential injuries and exposure to dust or harmful particles during the scraping process.
- Position Yourself Correctly: Stand with your feet shoulder-width apart, maintaining a stable and balanced posture. This helps you apply even pressure on the scraper, making the task more efficient and less strenuous.
- Begin Scraping: If you’re using a manual floor scraper, position the blade at a slight angle to the floor and push or pull it along the surface, depending on the scraper type. For power scrapers, follow the manufacturer’s instructions for operation.
- Work in Sections: Divide the floor into manageable sections and focus on one area at a time. This approach ensures a systematic and thorough scraping process, preventing fatigue and ensuring consistent results.
- Adjust Pressure as Needed: Pay attention to the resistance you encounter. Adjust the pressure on the scraper based on the floor type and the material you’re removing. Too much pressure may damage the subfloor, while too little may slow down the process.
- Clean Up: Periodically clean the scraper blade to remove accumulated debris. This not only maintains the scraper’s effectiveness but also prevents scratches on the floor.
- Repeat as Necessary: Depending on the condition of the floor and the material being removed, you may need to repeat the scraping process until the surface is smooth and free of residues.
- Finish with Detail Work: Once the majority of the floor is scraped, focus on any remaining patches or corners that require detailed attention. A hand scraper may be useful for intricate areas.
Conclusion:
Mastering the art of floor scraping requires patience, precision, and the right tools. By following these steps and taking the time to prepare and execute each phase carefully, you’ll achieve a clean and smooth floor surface, setting the stage for a successful renovation or remodeling project. Remember, safety first, and happy scraping!
Related Posts
 Outdoor Stair Railings: Combining Safety, Durability, and Style
 Can A Criminal Justice Attorney In Richardson Defend You?
 Ultimate Guide To Boosting Your Instagram Stories Viewers
 Easy Tips For Choosing The Right Pediatric Dentist
 How To Improve Your Dental Health
 Top Cardinal Cabinets Tips For A Stunning Kitchen